Showing posts with label Clinique. Show all posts

December 30, 2011

Call It Beauty's Best Of 2011


Another year gone by... It's amazing how quickly time actually passes by when you start thinking about what has happened throughout the year and how much you've done (or in some cases, how much you didn't do). 

I always get a rush of emotions whenever the year ends... This year, what I feel the most is gratitude. I'm so thankful for all the friendships forged through blogging (Lipstick Bandits, I'm talking bout you :p), for general health/well-being, for a job that can sustain the blog :p... We have so much to be thankful for. Sometimes we forget when we are so caught up with the every day things. But we are all honest with ourselves, it's true. We have a lot to be grateful for.

Anyway, all of that aside, let's get to what I really came here to do, which is share with you my top picks for 2011. I feel like I probably picked too many things, but I can't help loving them all! The following products are the best that I've tried and my absolute favourite items to use in the year 2011.
Here we go...


FACE


CHEEK


EYES


LIPS


SKINCARE


NAILS

OPI - Steady As She Rose


BATH & BODY


HAIR


TOOLS


And there you have it... My "best of the best" for 2011. 

I do hope you all have a wonderful New Year's Eve! Have fun and stay safe! And I wish you all a fabulous 2012. I can't wait to see what 2012 has in store for me and I hope that the upcoming year has nothing but the best for all of you, because you all deserve it!


HAPPY  NEW YEAR!!!
from Call It Beauty


December 16, 2011

All About Eyes - I'm Getting Sunburned


I was immediately drawn to this Wet n' Wild Color Icon Eyeshadow Trio in I'm Getting Sunburned because of the colour combination. This is definitely not the kind of look I would've put together myself, which is why I really like the WNW palettes - it helps me "think outside the box" a little bit more.

To start off, I applied the Browbone shade on the lid (I'm a rebel! Rawr!), but not all the way up to the outer edge. I also applied this shade along the lower lash line. Then, I applied the Crease shade on the outer corner and a little but on the outer third of the lower lash line. Then I blended the Eyelid shade along the crease, placing more product on the outer corner and softening it as I blended it inwards. To finish off, I applied Clinique Brush-On Cream Liner on the upper lash line. This look would definitely look better with eyeliner on the lower water line and some mascara, but my eyes were a bit itchy that day and I didn't want to exacerbate whatever reaction it was any further. Or maybe I'm just turning into Larie :p.


Hope you all like this look!


November 28, 2011

All About Eyes - Fall


Products Used:
Urban Decay Naked Palette - Half Baked & Hustle
Sleek MakeUP i-Divine Palette - Sunset Palette (frosted red shade)
Clinique Brush-On Cream Liner - True Black
Rimmel Volume Flash The Max Bold Curves - Black
Prestige Cosmetics Brow Perfection Revitalizing Brow Gel - Clear

You know why I could never imagine myself living in a place with no seasons? Because seeing the leaves change colour is truly a sight to behold. That was what inspired me to use gold and red in this look. To start off, I applied Half Baked (so pretty!) on the lid and up to, but not above, the brow bone; I also applied a smidge of this to the inner, lower lash line. Then I used Hustle (one of my favourites in the Naked Palette) along the outer corner for a smokier effect and also to create some depth. I also used a little of this along the lower lash line for more definition. Then for some drama, I applied one of the red shades from Sleek's Sunet palette along the center of the lid and blending it towards the outer corner (a little "trick" I've seen a few YouTube makeup artists/guru's do in various videos). I have to say, I really like the effect it gives. Perhaps I shall use that trick more often.

Lastly, I applied gel liner along the top lid (flicking it gently otuwards) & along the lower water line; then I applied 2-3 coats of mascara to top lashes.


Hope you all like my Fall look =).


October 26, 2011

All About Eyes - A Shot of Peacock


Products Used:
NYX Single Eyeshadow - Rootbeer
MAC Eyeshadow - Patina
The Body Shop Eye Colour - Peacock Green
Clinque Brush-On Cream Eyeliner - 02 True Black
Revlon Beyond Natural Mascara - Blackest Black
NYX AUTO Eyebrow Pencil - Black


Firstly, I applied Rootbeer eyeshadow all over the lid, then I blended it out with Patina eyeshadow. Next, I applied Peacock Green eyeshadow with a pencil brush on the lower lash line, all the way to the corner. I lined my eyes with a Clinique Cream Eyeliner and extended the line outwards; I also applied this liner on the lower water line. Now because the eye look itself is fairly simple, I wanted to make the eyebrows more a bit more intense. So I used an eyebrow pencil to not only fill in the gaps, but to make my eyebrows look thicker than they really are. I did this by focusing the colour more on the edges of my brows. To finish off, I applied a few coats of mascara to both top and bottom lashes. 


Hope you guys like this look! :)


* This is a pre-written post queued up for today, as I am currently on a month-long trip. Please do still leave a comment, I will be checking in once in a while. :)

October 19, 2011

About Face - Intense Eyeliner Look

(someone forgot to comb their eyebrows >.<)


I was inspired to recreate this look after seeing Michelle Phan's "Fun Eyeliner Looks" video on YouTube. I loved the intensity, so I whipped out the eyeliners and got to it. If you'd like to know how to create this look, then go ahead and take a look at Michelle's video (this part starts at 2:05) because for some reason, I decided to do it the hard way (i.e. using liquid liner from the get go).

Of course, I gave it my own little twist by adding another dimension to the look (you'll see in the photos below), changing the shape up a little bit so it's not as round at the top, and extending the line in the corner a little bit longer.


Products Used:

Revlon PhotoReady Foundation - 005 Natural Beige
Revlon PhotoReady Concealer - 003 Light Medium
Lancôme Star Bronzer - Éclat Bronze
Clinique Brush-On Cream Liner - True Black
NYX Cosmetics Jumbo Eye Pencil - Black
Eyeko Graffiti Eye Pencil - Jet Black
NYX Cosmetics 10 Color Palette - Velvet Rope (black w/ red-violet glitter eyeshadow)
Joe Fresh Matte Lipstick - Poppy


The most complicated part about this look was definitely getting the shape down for the eyes. I used Clinique's cream liner to trace out the shape, NYX's Jumbo Eye Pencil to fill in all the gaps (including the upper and lower waterline), and Eyeko's Graffiti Eye Pencil to make the points as precise as I could. To top off the eye look, I patted a black eyeshadow with red-violet glitter shot through on the lids. 


Hope you guys like this look!


* This is a pre-written post queued up for today, as I am currently on a month-long trip. Please do still leave a comment, I will be checking in once in a while. :)

July 12, 2011

All About Eyes: Naked Palette - Numéro Un


Products Used:
Urban Decay Naked Palette (mine! It is miiine!) - Sin, Naked, Buck, Creep, Virgin
Clinique Brush-On Cream Eyeliner - True Black
Urban Decay 24/7 Glide-On Eye Pencil - Zero
L'oréal Voluminous Waterproof - Carbon Black


Firstly, I applied Sin all over the lid as a base, starting from the upper lash line to just above the crease. Then I applied a combination of Naked and Buck to the area between my crease and my brow bone. Next, I swept Creep from the lash line up towards the brow bone, layered directly on top of Sin. I blended Creep into the Naked/Buck (buck naked?) combo, creating a subtler v shape on the outer corner of my eye. I also applied this quite low along the lower lash line. Then I used Virgin to highlight the brow bone and to soften the edges of the darker shadows. To finish off this rather simple look, I lined my upper water line with Clinique cream eyeliner, liner my upper & lower water lines with Urban Decay's glide-on pencil and applied multiple coats of mascara to both top & bottom lashes.


Hope you all like my first Naked Palette look!
There will be more to come soon =).


May 5, 2011

All About Eyes - Peacock Green


Products Used:
The Body Shop Eye Colour - Peacock Green
MAC Eyeshadow - Patina & Naked Lunch
Clinique Brush-On Cream Eyeliner - True Black
Revlon Beyond Natural Eyelashes - 91155


I purchased Peacock Green a few weeks ago because I fell in love with the colour. For this look, I decided to let it take center stage and keep everything else simple. First, I applied the shadow all over the lid with a brush that has short, dense bristles so I could really pack on the colour. Although, I didn't really need to work with it too much because it's nicely pigmented. I also applied this shade along the lower lash line with a pencil brush. Then, I applied Patina along the crease and blended it with the green to diffuse any harsh lines. Next, I used a fluffy brush to sweep some Naked Lunch along the brow bone for a pretty highlight. 

To finish off the look, I lined my upper lash line and lower line with a black gel eyeliner from Clinique, brushed through my brows with a groomer, and applied false eyelashes from Revlon. 


Hope you all like this simple, but colourful look! :)


May 2, 2011

Monthly Favourites - April 2011


Goodbye, April! Thank you for some pretty amazing weather and general good times. For some of you, you're looking forward to the warmer weather. Can't say I am since I'm a bit sensitive to heat, but I'm ready for the feeling of summer. You know, driving around with the music turned up high, summer sunsets, barbeques, et cetera.

Anyway, enough chit chat. Here are Call It Beauty's favourites for the month of April:


1. The Body Shop - Earth Lovers Shower Gel in Watermelon & Eucalyptus


A lovely scent, a great lather, and 100% biodegradable; I have used this shower gel the most this past April. It's sulphate, paraben, and colorant-free as well, so not only will you be helping the environment, but you'll smell good while doing it, too!

This shower gel comes in 5 other scent combinations if they are more to your liking. Or, you can purchase an unfragranced bottle and concoct your own blend. 


2. Revlon - Nail Polish in Tangerine & L'oréal - Nail Polish in Waters Edge


These nail polishes are gorgeous on their own but in April, I really took to combining them with other colours that are already in my arsenal (as you can see above). 

Unfortunately, the constant use of nail polish that month put my nails in rough shape, but I can't wait til I can don these colours again!


3. Sigma - F40 Large Angled Contour Brush


Whether applying contour or blush, this brush will do it perfectly for you. I love how soft it is and how wonderfully it blends whatever cheek product I may use. Since I've been really into blushes lately, the F40 has been my most reached for tool this month.


4. Cargo Cosmetics - Blush in Tonga


This blush is probably my favourite April purchase. It's such a gorgeous colour, the texture is amazing, and it blends so well into the skin. Because of it's neutral tones, it somehow acts as a contour as well which comes in handy when you want a bit more definition but don't really want to reach for another product. 

This blush really is amazing and since I've purchased it, I've been wearing it every time I wear makeup.


5. Clinique - Brush On Cream Liner in True Black


I purchased this product because Sam of Pixiwoo stated in one of her videos that the product doesn't dry out (unlike MAC Fluidlines). I've been using MAC Fluidline for some years and would continue to use it even though the products had dried out quite a bit because I hate wasting product. I figured if I bought this, I would eliminate that problem.

I have to say I really like the formula! It's applies smoothly and doesn't take much product to get an opaque line. Also, unlike my Fluidline, it doesn't migrate south as much throughout the day, which is always a bonus. I still get a bit of product down there, but nothing too obvious. It also applies and stays on the waterline better.

It comes with a brush, which is handy for traveling and touch ups, but the handle is so short, I find myself having a hard time controlling my application. But all in all, this is an amazing product by Clinique.


What are your favourites for the month of April?


April 21, 2011

All About Eyes: Runway Edition- Oscar de la Renta

(photo from Makeup For Life)

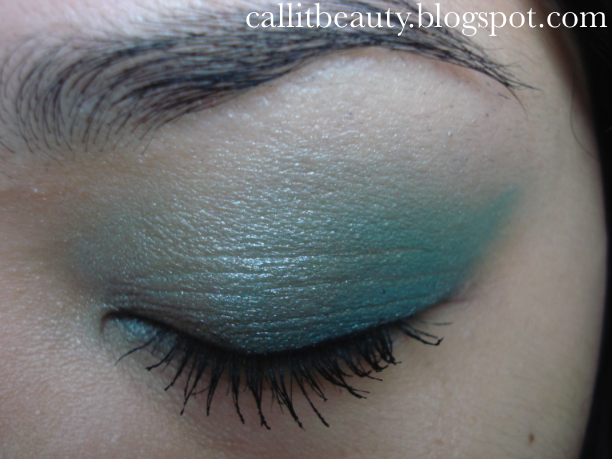
This is my take on a gorgeous, green look that was seen in Oscar de la Renta's Spring/Summer 2011 Runway show, which I pretty much fell in love with. Check it out:


Products Used:
Sleek MakeUP i-Divine Palette - Original (teal)
Sephora Color Play 5-in-1 Palette - light blue-green & white-green
MAC Fluidline - Blacktrack
Clinique High Impact Mascara - Black


With an eye shading brush (I used Sigma's E55), I packed on the light blue-green shade on the lid, ending about halfway across the lid and just at the brow bone. With the same brush, I applied a teal shade along the outer half of the eyelid, creating a subtler flick than the one found on the model. Then with a pencil brush, I used the light blue-green shade again and applied to the the inner third of the lower lash line. With the same brush, I applied the teal shade along the rest of the lower lash line, blending it into the shadow at the outer corner. Next, I applied the white-green shade along the edge of the socket and the brow bone to soften the edges a bit. I used a large, fluffy eyeshadow brush for this.

I wanted the eyebrows to be quite natural, so I simply brushed through the hairs with an EcoTools brow groomer. Then with an EcoTools angled eyeliner brush, I applied Blacktrack Fluidline to the upper lash line, upper water line and lower water line. I created thicker line than one you would find on any of the models because I find my smaller eyes need a bit more definition. Lastly, I curled my lashes and applied 2-3 coats of Cliniqe's High Impact mascara.


Hope you like it :)


LinkWithin

Related Posts with Thumbnails