October 28, 2011

My Skin Loves Pure+simple's Organic Rosehip Face Oil


I first tried this face oil when Pure+simple included a sample with my package (I initially ordered their all natural sunscreen) and I loved it right away. I kept using it for a few weeks until I decided to purchase a full size bottle during their Midnight Madness sale. Here's what Pure+simple has to say about the product:

Rosehip oil contains 80% essential fatty acids (EFAs), predominantly linoleic (Omega 3) and linolenic (Omega 6) and is naturally enriched with antioxidants like beta-carotene and lycopene.

  • Naturally contains Trans-Retinoic Acids that helps regenerate damaged skin tissue
  • Helps to decrease and prevent hyperpigmentation, wrinkles and scars
  • A perfect skin rehydrator that restores moisture balance
Ideal for:
  • Preventative Anti Aging
  • Sensitive/dry skin
  • Mature skin
  • Sundamaged, hyperpigmented skin
Directions for uses:
  • Use as a hot oil treatment for brittle, damaged hair or as a scalp treatment
  • Use in place of a moisturizer day and/or night
  • Use under your moisturizer for ultra hydration and/or to prevent/correct fine lines and pigmentation


This Organic Rosehip Facial Oil is fairly lightweight (much more than Josie Maran Argan Oil, which I also love), so it's been perfect for this transitioning period. I used to have a Summer moisturizer and a Winter moisturizer and would just put up with using one or the other during the Fall or Spring. But now I no longer have to do that, thanks to this facial oil.

It has a slight fishy scent; very slight, mind. It definitely has a very natural scent (which makes sense, considering it's an all natural product), which might be a problem for some people. As for me, I find the scent to be pretty mild and non-offensive. 


This face oil sinks into the skin wonderfully and doesn't leave any tacky residue on the skin, which is perfect for this transitioning period. It moisturizes my skin really well without making it oily, which is what most people assume when talking about face oils. But nope! This baby absorbs well and doesn't just sit on top of your skin.

After using it for a week or two, I definitely noticed that my skin looked more even. The pigmentation around my chin area (due to an uneven Summer tan) lessened somewhat (or at least it looked like it :p)  and I would wake up with glowing, hydrated skin.

That's the best part, really: the feeling that my skin has what it needs, which is something that I've only experienced with a few other moisturizers. My skin feels like it should: healthy and hydrated. Plus, it's an all natural product, so I know that my skin is truly being nourished with products that won't harm me or the environment. Bonus points, yo!


Are you a fan of facial oils?


October 26, 2011

All About Eyes - A Shot of Peacock


Products Used:
NYX Single Eyeshadow - Rootbeer
MAC Eyeshadow - Patina
The Body Shop Eye Colour - Peacock Green
Clinque Brush-On Cream Eyeliner - 02 True Black
Revlon Beyond Natural Mascara - Blackest Black
NYX AUTO Eyebrow Pencil - Black


Firstly, I applied Rootbeer eyeshadow all over the lid, then I blended it out with Patina eyeshadow. Next, I applied Peacock Green eyeshadow with a pencil brush on the lower lash line, all the way to the corner. I lined my eyes with a Clinique Cream Eyeliner and extended the line outwards; I also applied this liner on the lower water line. Now because the eye look itself is fairly simple, I wanted to make the eyebrows more a bit more intense. So I used an eyebrow pencil to not only fill in the gaps, but to make my eyebrows look thicker than they really are. I did this by focusing the colour more on the edges of my brows. To finish off, I applied a few coats of mascara to both top and bottom lashes. 


Hope you guys like this look! :)


* This is a pre-written post queued up for today, as I am currently on a month-long trip. Please do still leave a comment, I will be checking in once in a while. :)

October 24, 2011

Fall Nail Colours!

During the Summer, coral was my go-to shade. For the Fall, I'm taking a cue from Summer by sticking with the same shade family and using mustard and orange shades. Admittedly, I was a bit excited for Fall so I started wearing this at the end of August and early September. 


Joe Fresh Style Nail Polish - Pineapple

Joe Fresh Style nail polishes are great quality, two coats is all you need. The only thing I don't like is the rather short and fat handle, which makes it difficult to use sometimes.


NYX Cosmetics Matte Nail Polish - Orange

I love this shade! The matte finish definitely makes it more interesting as well. Unfortunately, it doesn't take much to make this nail polish chip. Admittedly, I didn't use a top coat; but seeing as there are plenty of products out there that last even without it, this is going to be labelled a disappointment. Even still, I love wearing it, I just don't expect to be wearing it for very long :p.


What are your go-to shades for Fall?


October 21, 2011

Collection Spotlight: Elie Saab - Fall 2011


(photos from style.com)


You guys... You guys, I can't.

I am head over heels in love with these Elie Saab dresses. I am legitimately at a loss for words right now because I feel like I just got slapped in the face with gorgeousness. I love how all the embellishments just pop out so much more against the sheer fabrics. The shades are all lovely, from ice blue to cream, from blush to taupe and finally, midnight blue. 

Classy, elegant, and absolutely stunning. I can't even pick a favourite because then I'd end up writing about every single dress...

I can't even...


Happy weekend, lovelies!


October 19, 2011

About Face - Intense Eyeliner Look

(someone forgot to comb their eyebrows >.<)


I was inspired to recreate this look after seeing Michelle Phan's "Fun Eyeliner Looks" video on YouTube. I loved the intensity, so I whipped out the eyeliners and got to it. If you'd like to know how to create this look, then go ahead and take a look at Michelle's video (this part starts at 2:05) because for some reason, I decided to do it the hard way (i.e. using liquid liner from the get go).

Of course, I gave it my own little twist by adding another dimension to the look (you'll see in the photos below), changing the shape up a little bit so it's not as round at the top, and extending the line in the corner a little bit longer.


Products Used:

Revlon PhotoReady Foundation - 005 Natural Beige
Revlon PhotoReady Concealer - 003 Light Medium
Lancôme Star Bronzer - Éclat Bronze
Clinique Brush-On Cream Liner - True Black
NYX Cosmetics Jumbo Eye Pencil - Black
Eyeko Graffiti Eye Pencil - Jet Black
NYX Cosmetics 10 Color Palette - Velvet Rope (black w/ red-violet glitter eyeshadow)
Joe Fresh Matte Lipstick - Poppy


The most complicated part about this look was definitely getting the shape down for the eyes. I used Clinique's cream liner to trace out the shape, NYX's Jumbo Eye Pencil to fill in all the gaps (including the upper and lower waterline), and Eyeko's Graffiti Eye Pencil to make the points as precise as I could. To top off the eye look, I patted a black eyeshadow with red-violet glitter shot through on the lids. 


Hope you guys like this look!


* This is a pre-written post queued up for today, as I am currently on a month-long trip. Please do still leave a comment, I will be checking in once in a while. :)

October 17, 2011

I'm On The Fence About MAC Pro Longwear Foundation


Here's the thing, I never really felt the need for long-wearing makeup before. But then I became vainer started working long hours and the weather got pretty hot, so I started seeing the need for long-wearing foundation. I used to have the time to remove all my makeup and start again, but now that my life is a little bit hectic, I don't even have the time to plant myself into a mirror, much less wash my face and re-do my makeup. 

I tried samples of Esteé Lauder's Double Wear Foundation (changed my life, forreal), but I wanted to use that as my "special occasion" foundation. Double Wear made my skin look near perfect, and I didn't want my skin look flawless every day. Yes, you read that right. My reasoning? Well, I don't want my face to be an illusion. I'm not trying to get too deep here, but I don't want to wear a mask every day. So I started looking for a foundation that was long-wearing but didn't provide absolutely flawless coverage and MAC Pro Longwear seemed to fit the bill.  


(blended slightly)

From MAC: A long-wear foundation that gives up to 15 hours of wear in any environmental condition. Lightweight and creamy, applies smoothly to provide sheer to medium coverage. Even in hot and humid conditions, controls oil to keep skin fresh, natural and flawless. Provides everyday SPF protection.

Firstly, I would say that this product provides medium coverage. It has a thicker consistency than Esteé Lauder Double Wear, it doesn't run down the back of my hand at all. I purchased the shade NC25, which is my normal shade; it's a tad too light for me at the moment because my skin is still holding on to the last vestiges of my summer tan. As you can see from the photo above, it's definitely too light for my hand. That's because I have the privilege of having my body be a completely different colour than my face. Ever since I was a child, my body has been darker than my face :p. 


I love that this foundation comes with a pump. It locks in place (see above photo) and when you click it to the left, it unlocks. Perfect for traveling! The pump also dispenses the perfect amount of product, which was something I was worried about because I've heard the Pro Long Concealer dispenses a lot of product. 

The texture of this foundation is quite nice. Despite its consistency (similar to Revlon Colorstay), it doesn't feel thick on the skin. It does dry fairly quickly though, so you need to work fast in order to blend it out. It has a bit of a powdery finish, which accentuates drier areas a bit.


(taken immediately after application)

As you can see, it doesn't really even out the skin enough, unlike Double Wear. My face didn't tan evenly during the Summer and I have darker areas around my chin, so I definitely have to wear concealer on those areas on top of the foundation. Also, because of the powdery finish, it tends to cling to the little dry patches I have.

So why did I bother with this foundation? Well, despite not evening out my skin the way I would like it to, it does make my skin look quite nice. After a few hours of wear, my skin takes on a more natural finish and that's when Pro Longwear really excels. There's a bit of dewy-ness that comes through, but I do find myself needing to blot after a few hours. I guess that's why I'm on the fence about it. I wish it provided a tad more coverage so that my skin looks more even, but on the other hand, it makes my skin look lovely after an hour of wear time. I do know that once my skin has evened itself out (i.e. once my tan disappears), this foundation would be perfect for me. Perhaps I'll revisit this review once that time has come...

Pro Longwear Foundation can be purchased at freestanding MAC stores or MAC counters in The Bay for $36.50 CAD.


Are you a fan of MAC's Pro Longwear Foundation?
Have any tips for me on how to make it perform better?


October 14, 2011

Collection Spotlight: Jason Wu - Fall 2011


(photos from style.com)

There's something about the crispness of black and white that never gets old. Absolutely love the tuxedo look in set one and the lovely dress in set two - I can just imagine wearing that at a Christmas party with red, velvet pumps. 

I also love the shots of colour, especially paired with lace or see through pieces. I especially love the blue blazer, the shade adds some oomph to a classic wardrobe piece.

Lastly, I love the see-through nude + black, high waisted skirt combo. And goodness, those slits insane! My favourite is gown in the middle of the last set. If it looks familiar, it's because the gorgeous Diane Kruger wore something very similar to the MET Ball earlier this year. 

P.S.
I am now obsessed with polka dotted hosiery, it adds such a lovely touch. It's very subtle, but when you notice it, it really grabs your attention. I definitely need a pair for my wardrobe!


Happy weekend, lovelies!


October 12, 2011

About Face: Runway Edition - Jil Sander


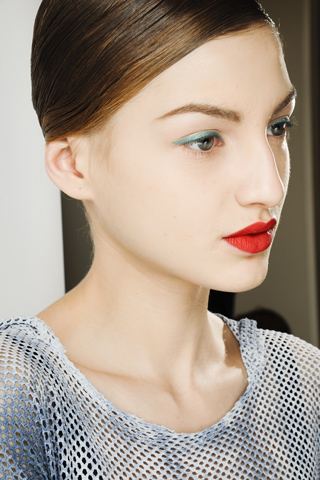
I love this Jil Sander look (from the Fall 2011 RTW show) because of its simplicity.

And yet, even in its simplicity, it's emphatically not boring. The jade eyeliner and the bright red lips make a subtle, but striking combination. Here's my take on this look created by makeup artist and global Creative Director for Chanel makeup, Peter Philips.


Products Used:
Revlon PhotoReady Foundation - 005 Natural Beige
Revlon PhotoReady Concealer - 003 Light Medium
NYX Cosmetics Rouge Cream Blush - Natural
Urban Decay Naked Palette - Buck
Cargo Cosmetics Swimmables Waterproof Eye Pencil - Teal
Wet N Wild Color Icon Palette - Pride (metallic green)
 L'oréal Voluminous Mascara - Carbon Black
Revlon Super Lustrous Creme Lipstick - Fire & Ice


In order to get a shade as close to the original as possible, I simply layered a Wet N Wild eyeshadow from the Pride Color Icon Palette on top of a Cargo Cosmetics Swimmables Eye Pencil in Teal. I winged out the eyeliner as much as I could with the pencil and fixed it up so the tip was more pointed with an angled eyeliner brush. I then applied a few coats of L'oréal Voluminous mascara.


I wanted to try something a teeny bit different with my lips. Firstly, I outlined my lips with Revlon's Fire & Ice lipstick and a lip brush. I wanted to really exaggerate the bow of my lips so I dipped the center line down more than I normally would. I also wanted to make my lower lip look less full by outlining it before my natural lip line. Unfortunately, this didn't work out so well because my natural lip line is quite pigmented. 


As I've mentioned before, I don't have the kind of face that can go without any cheek colour, so even though I didn't see any blush on the model's cheeks, I still added cream blush (NYX Rouge Cream Blush in Natural) to give my face a bit of shape. 


Hope you like! :)


* This is a pre-written post queued up for today, as I am currently on a month-long trip. Please do still leave a comment, I will be checking in once in a while. :)

October 10, 2011

Tarte's Smooth Operator Amazonian Clay Concealer Smoothes Away Dark Circles


A lot of my base choices lately have been connected to my trip to the Philippines (where I am now as you are reading this), so I needed a concealer that was going to keep up with humidity, high heat, and long days. I've read good things about Tarte's Smooth Operator Amazonian Clay Waterproof Concealer online so I decided to head to Sephora and pick one up for myself.

Here's what Tarte has to say about this product:

What it is:
A waterproof concealer powered by Amazonian clay, nature's most perfect ingredient, to balance and soothe skin.


What it does:
This waterproof, full-coverage concealer combines the calming properties of vitamins A and E and the soothing quality of Amazonian clay to nourish while completely masking discolorations and imperfections for better looking skin. Amazonian clay acts as a total skin balances by reducing dryness and flakiness while improving the appearance and texture of skin for longer, waterproof wear! The buildable, full-coverage formula is rich in pigments for truer colour without a heavy or tacky texture, making it ideal for hiding any and all imperfections from dark circles to blemishes to redness. Designed for brush-free application, blending this creamy concealer with your finger allows the formula to melt into the skin for an easy application and opaque airbrushed effect. 


What it is formulated WITHOUT:
- Parabens
- Synthetic Fragrances
- Synthetic Dyes
- Phtalates


What else you need to know:
Skinvigorating™ benefits come from: Amazonian clay a nutrient-rich, multitasking and total skin-balancing clay that reduces dryness and flakiness, improves skin clarity, elasticity, firmness and texture while removing oil from the skin's surface for smooth application and wear; Vitamin E, a natural preservative that also acts as an anti-inflammatory emollient and protects against free radical damage; and mineral pigments known to soothe and soften the skin. 


Ok, so that's a lot of promises Tarte is making. It kind of makes me want to fly over to South America, head to the Amazon and proceed to slather Amazonian clay all over my skin... That sounds weird O_o.

I can't personally attest to all the "Skinbenefits™" Tarte claims but I do know one thing: Smooth Operator is a kickass concealer! The texture is uh-may-zing - it smoothes on so effortlessly and blends like a dream. It never looks cakey and never makes my dry under eyes look, well, dry (unlike MAC Studio Finish Concealer).

The packaging feels quite luxurious, with a cap that stays on very securely. It feels substantial on my hand - not flimsy, but not heavy either. The lovely packaging and the ingredients are probably the cause of its $22 USD / $27 CAD (that's totally an estimation) price tag; though I do wish you get more product. 0.07 oz is definitely not a lot of product and with its creamy nature, I'm finding that I'm going through one of these tubes quicker than I would like.


(The BEFORE photo doesn't do my dark circles justice - they are much worse than that!)

Nevertheless, Smooth Operator conceals my dark circles SO well. It's no miracle worker, by any means (at this point I think the only way to completely banish them is to get a skin transplant :p), but it works better than any concealer I've ever tried. Not only that, it also lasts long on the skin! Even when I find myself rubbing away any migrating product (usually mascara) from my under eye area, the concealer still stays put. Now, I can't say that absolutely no concealer gets removed, but it's definitely not noticeable. 

I've been loving this concealer since I first started using it in August and I'm so glad I was finally able to find something that would do a great job concealing and still be long-wearing. I haven't tried and tested a massive amount of concealers, far from it. So it might be a bit of a premature statement to make, but I'll make it anyway: Tarte Smooth Operator Concealer is definitely my favourite concealer!


Any fancy tricks for concealing dark circles?


October 5, 2011

About Face: Runway Edition - Armani Privé

(photo from style.com)


When I first saw this photo from Armani Privé's Fall 2011 Couture show, I instantly fell in love... I just knew I had to recreate it! So here's my little take on this gorgeous look created by makeup artist and Armani Cosmetics' creative director, Linda Cantello.


Products Used:
NYX Jumbo Eye Pencil - Milk
Sleek MakeUP Palette - Circus (orange and red shades)
NYX Eyeshadow - Tropical
Urban Decay Naked Palette - Creep
L'oréal Voluminous Mascara - Carbon Black


To start off, I applied NYX's Jumbo Eye Pencil in Milk all over the lid as a base. Then, I combined the matte orange and matte red shades from Sleek's Circus Palette and applied it all over the lid, just until the brow bone. Next up, I applied Creep from Urban Decay's Naked Palette along the upper lash line, winging it out quite a bit. About midway through the winged out portion, I started lining through the brow bone. I used a fluffy brush to blend away any harsh lines, then repeated the process, alternating between lining and blending until I was happy with the look. Then I applied Creep on the lower lash line as well, winging it upwards parallel with the upper line. I also made sure that I blended the eyeshadow downward so that the line isn't so severe. Next up, I used NYX eyeshadow in Tropical and lightly dusted that along the brow bone, over top of all existing eyeshadow. I used the Jumbo Eye Pencil in Milk again to line the lower water line and also to fill in the space between the two lines of Creep eyeshadow. Lastly, I curled my lashes and applied 2 coats of mascara.


Products Used:
Revlon PhotoReady Foundation - 005 Natural Beige
Tarte Smooth Operator Amazonian Clay Waterproof Concealer - Light
MAC Eyeshadow - Quarry
Korres Lip Butter - Jasmine
MAC Mineralize Skinfinish - Soft & Gentle


According to Linda Cantello, Armani didn't want any colour on the face. Unfortunately, I don't have the kind of face that can pull off no colour; it would look entirely shapeless! So I thought that a bit of contouring might be in order and applied Quarry onto the hollows of my cheeks and Soft & Gentle on the tops of my cheekbones. 

The model's lips look quite natural; in fact, she looks like she's not wearing any product. So, I applied Korres Lip Butter in Jasmine on my lips for a little bit of sheen.

I have to say, I'm quite proud of this recreation. The look is so beautiful and just inspires me to be more creative. Not to mention, it allows for me to work on my application technique :).


Hope you all like this look!


* This is a pre-written post queued up for today, as I am currently on a month-long trip. Please do still leave a comment, I will be checking in once in a while. :)

October 3, 2011

I've Never Felt This Way About Nail Polish Before...


I'm not really that into nail polish. My love for it goes in phases, you see. I'll want to paint my nails every week for months, then I'll see what horrid shape my nails are in and then I forgo nail polish for a few months to grow them out. I typically use nail polish a few times and promptly forget about it...

Not so with this one. For the first time ever, I found myself considering purchasing a backup. I mean, can you blame me? Just look at it!

First of all, I've been aching for Facets of Fuchsia ever since I saw it on Makeup Savvy. I may or may not have gone to drugstores nearly every day checking to see if it was in stock and I may or may not have gasped and walked at a brisk pace towards the display when it finally was. No confession here...

It takes a lot of coats to get opacity (I think I did 4 or 5), but do I care? Nope! Coz it's soooo gorgeous *insert-pitiful-sigh-here*. I have bought a black nail polish to layer under it, though (I got the idea from Larie); so that should help a lot. It has a bumpy texture due to the glitter so I applied a top coat to "seal it in" so to speak.

I'm not normally into glitter nail polishes but the mixture of the bigger chunks and the smaller pieces looks much more interesting than your normal glitter. Fuchsia on black is pretty sexy, too. I love!


What are your favourite glitter nail polishes?


LinkWithin

Related Posts with Thumbnails