Showing posts with label All About Eyes. Show all posts

March 14, 2012

All About Eyes - Mermaid


Products Used:
Make Up For Ever Eyeshadow - Turquoise Shimmer 83, Purple 92 & Black 4
Make Up For Ever Aqua Eyes Eyeliner - Mat Black 0L
Maybelline Great Lash Mascara - Blackest Black


So I figured I'd finally use some of the MUFE eyeshadows from my kit in a look.

My kit contains 8 neutral shades and 4 brighter, colourful shades. I had already used one of them on another look I've posted on the blog, another one is yellow and I wasn't in the mood to do yellow. That left teal and purple, so that's what I went with. It's totally not because teal and purple are my favourite colours, guys. </sarcasm>

Also, I think Turquoise Shimmer should be called Teal Shimmer. But that's just me...

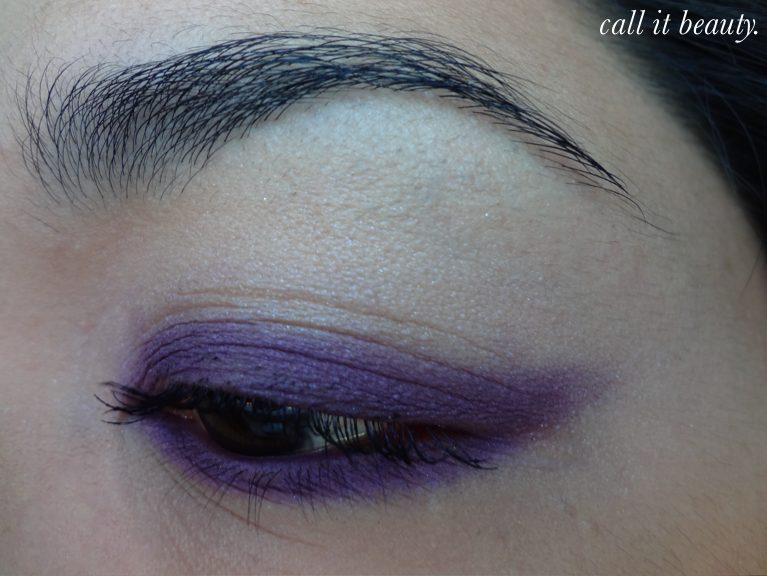
Anyhoo! To start off, I applied the "teal shade" on the lid, ending just above my crease (if you can call it a crease :p). Then, I blended the matte purple shade above the teal shade, creating a V shape at the outer corner and keeping it really soft at the inner corner. Next, I applied the matte black shade just on the outer corner for a bit more depth. Then with the teal shade, I applied it just to the centre of the lower lash line and applied the matte black shade softly on either side. Lastly, I applied eyeliner on the lower water line, upper water line and very sparingly on the upper lash line, then finished off with two coats of mascara on the upper lashes only. 


Hope you guys like this look!


December 16, 2011

All About Eyes - I'm Getting Sunburned


I was immediately drawn to this Wet n' Wild Color Icon Eyeshadow Trio in I'm Getting Sunburned because of the colour combination. This is definitely not the kind of look I would've put together myself, which is why I really like the WNW palettes - it helps me "think outside the box" a little bit more.

To start off, I applied the Browbone shade on the lid (I'm a rebel! Rawr!), but not all the way up to the outer edge. I also applied this shade along the lower lash line. Then, I applied the Crease shade on the outer corner and a little but on the outer third of the lower lash line. Then I blended the Eyelid shade along the crease, placing more product on the outer corner and softening it as I blended it inwards. To finish off, I applied Clinique Brush-On Cream Liner on the upper lash line. This look would definitely look better with eyeliner on the lower water line and some mascara, but my eyes were a bit itchy that day and I didn't want to exacerbate whatever reaction it was any further. Or maybe I'm just turning into Larie :p.


Hope you all like this look!


December 5, 2011

All About Eyes - Blue Had Me At Hello


We have a bit of a 2-for-1 deal here at Call It Beauty with Wet N Wild's Color Icon Eyeshadow Collection in Blue Had Me At Hello. I'm already a fan of WNW's eyeshadows for their amazing colour payoff and the cheap price tag doesn't hurt, either.

I haven't really had the chance to really play with these eyeshadows and explore different shade combinations. So for these two looks, I decided to keep it simple (and by simple, I mean not really simple :p) and stick to the shade combinations that the shadows are grouped with. Here's what I came up with...


Look 1


To start off, I applied the crease shadow along the area above my crease but below my brow bone. Then I lined 3/4 of my lower lash line with the definer shade and connected it to the outer edge of the line below the brow bone. I would alternate application and blending with a fluffy brush until I was happy with the depth of colour and the softened edges. Next, I applied the eyelid shade on the eyelid and the inner third of the lower lash line and then touched up the crease shade a bit, making sure that both shades blended together. To finish off, I lined the upper lash line thinly with the definer shade, applied the browbone shade to the browbone and applied 2 coats of Rimmel Volume Flash The Max Bold Curves mascara (say that 5 times fast!).


Look 2


I really love this one, if I do say so myself :). 

I started off with the eyelid shade, which is a gooorgeous teal colour. I applied it on the lid, til then applied the crease shade on the outer 3rd area. I also used these same shades to line my lower lash line. Then I blended the browbone shade along the edge of the two shadows and lined my upper lash line and lower water line with the definer shade. To finish off, I applied a few coats of the same mascara I used for Look 1.


Hope you all like these looks! :)


November 28, 2011

All About Eyes - Fall


Products Used:
Urban Decay Naked Palette - Half Baked & Hustle
Sleek MakeUP i-Divine Palette - Sunset Palette (frosted red shade)
Clinique Brush-On Cream Liner - True Black
Rimmel Volume Flash The Max Bold Curves - Black
Prestige Cosmetics Brow Perfection Revitalizing Brow Gel - Clear

You know why I could never imagine myself living in a place with no seasons? Because seeing the leaves change colour is truly a sight to behold. That was what inspired me to use gold and red in this look. To start off, I applied Half Baked (so pretty!) on the lid and up to, but not above, the brow bone; I also applied a smidge of this to the inner, lower lash line. Then I used Hustle (one of my favourites in the Naked Palette) along the outer corner for a smokier effect and also to create some depth. I also used a little of this along the lower lash line for more definition. Then for some drama, I applied one of the red shades from Sleek's Sunet palette along the center of the lid and blending it towards the outer corner (a little "trick" I've seen a few YouTube makeup artists/guru's do in various videos). I have to say, I really like the effect it gives. Perhaps I shall use that trick more often.

Lastly, I applied gel liner along the top lid (flicking it gently otuwards) & along the lower water line; then I applied 2-3 coats of mascara to top lashes.


Hope you all like my Fall look =).


October 26, 2011

All About Eyes - A Shot of Peacock


Products Used:
NYX Single Eyeshadow - Rootbeer
MAC Eyeshadow - Patina
The Body Shop Eye Colour - Peacock Green
Clinque Brush-On Cream Eyeliner - 02 True Black
Revlon Beyond Natural Mascara - Blackest Black
NYX AUTO Eyebrow Pencil - Black


Firstly, I applied Rootbeer eyeshadow all over the lid, then I blended it out with Patina eyeshadow. Next, I applied Peacock Green eyeshadow with a pencil brush on the lower lash line, all the way to the corner. I lined my eyes with a Clinique Cream Eyeliner and extended the line outwards; I also applied this liner on the lower water line. Now because the eye look itself is fairly simple, I wanted to make the eyebrows more a bit more intense. So I used an eyebrow pencil to not only fill in the gaps, but to make my eyebrows look thicker than they really are. I did this by focusing the colour more on the edges of my brows. To finish off, I applied a few coats of mascara to both top and bottom lashes. 


Hope you guys like this look! :)


* This is a pre-written post queued up for today, as I am currently on a month-long trip. Please do still leave a comment, I will be checking in once in a while. :)

September 16, 2011

All About Eyes - 5 Looks From NYX Cosmetics 10 Color Palette In Velvet Rope


The best thing about eyeshadow palettes is all the fun you get to have playing with the different shades. I decided to try 5 completely different looks using this one palette. For every look, I used NYX's Jumbo Eye Pencil in Milk as a base and L'oréal Voluminous Mascara in Carbon Black (with the exception of the first look, in which I used Revlon Beyond Natural Eyelashes in 91155).

Now, in the interest of simplifying the write-up a little bit (and because I'm too lazy to describe each individual eyeshadow shade :p), I'll just label each shadow by their row and number them from left to right. So, T1-T5 and B1-B5, et cetera... T for top, B for bottom. Get it? So clever, I know.

On that note, here are the looks I created!


Un - Something Sultry


I applied B3 all over the lid and blended the edges out with B2. Then I highlighted the brow bone with shade B5 and lined all around the eyes with T5.


Deux - Something Soft


I used shade T3 from the inner corner to the middle of the eyelid and shade T4 from the middle to the outer corner. Then, I used shade B4 to to line the upper lash line, flicking it out in the corner.


Trois - Something Vibrant


Firstly, I applied shade T2 all over the lid, then applied shade B1 on the bottom lash line. Lastly, I applied shade B4 on the outer corners blending it outwards and making sure to blend it into the lower lash line as well.


Quatre - Something Linear


I applied shade T3 all over the lid with a fluffy brush for a softer look and also took it down to the lower lash line; I wanted it to look like a haze of lavender on the eye. Then I used shade T2 to line the eyes. I started with the top, using my usual technique for creating a flick. After that, I lined the lower lash line, making sure to keep both lines parallel. To finish off, I dusted some of shade B5 on the brow bone to highlight.


Cinq - Something Simple


I started off with the lightest shade (B5) all over the lid for a very light wash of colour. Then I used shade B3 to line all around the eyes, joining them together in the outer corner and flicking the shape up ever so slightly.


And there you have it! I had so much fun playing around with this palette and am so pleased with how the looks turned out.


Hope you guys like these looks! =)


LinkWithin

Related Posts with Thumbnails