Showing posts with label FOTD. Show all posts

March 15, 2013

Guess What, Lovelies?!


So a month or two ago, I was contacted by FASHION MAGAZINE to be part of their new online Beauty Panel. I missed the first challenge, but I was able to join the other lovely beauty bloggers for the second and it's all about: EMERALD. 

As you all must know, Pantone has declared emerald the colour of the year. So we were tasked with incorporating this particular shade into our beauty routines. 

I particularly love wearing colour on my lower lash line, so I decided to wear emerald there...


Products Used:
Rimmel Wake Me Up Foundation
Tarte Smooth Operator Amazonian Clay Waterproof Concealer
Anastasia Vol. I Bold Brows Kit
MAC Eyeshadows (Naked Lunch, Quarry, and Omega)
MAC Powder Blush (Taupe Shape)
MAC Mineralize Blush (Subtle Breeze)
Smashbox Be Legendary Lipstick (Posy Pink)
Maybelline Volum' Express Falsies Flared Mascara
NYX Cosmetics Slide On Pencil (Esmeralda)


And on a quick review note: the NYX Slide On Pencils are fabulous! They have stayed on my lower lash line without budging for 11 hours. With other long-wearing eye pencils, I notice fading after 5 or 6 hours, but the Slide On Pencils didn't move at all. And yet, they weren't difficult to apply (they are sooo soft, you guys!) or a pain in the you-know-where to remove. I'm definitely impressed... Which means I must get all the colours. ALL THE COLOURS, you guys!

Anyway, hope you guys like this look and if you have the time, please check out my post and all the other posts as well! 


How would YOU wear emerald?


December 24, 2012

Lipstick Bandits: The Secret Santa Look Swap


IT'S CHRISTMAS EVE!!!

In the Filipino culture, we celebrate on Christmas Eve and take it easy on Christmas Day, so the 24th has always been one of my favourite times of the year. Back in the Philippines, we would go to church for "Simbang Gabi" (translation: "night church") and then head back home for "Nochebuena", which is the meal we all eat at around midnight. After that, we open presents and then head to bed. 

Now that my family lives in Canada, we still continue with the tradition of celebrating on Christmas Eve and then keeping it mellow on Christmas Day (we usually watch a movie in the theatres); a tradition I think I will probably pass on to my own family. 

Anyway, the Lipstick Bandits have decided to do a little Christmas celebrating of their own by doing a "Secret Santa Look Swap". We were each given a Bandit to emulate through our makeup looks and here is what I came up with...


Some hints about my Bandit:

- She has beautiful, flawless skin (ok, they all do, so this is a crap hint)
- She has her flick technique down
- She likes coral-pink lip shades
- She has cuuute freckles
- She highlights the inner corners of her eyes like a pro

Any guesses???


If you guessed Monika of Rocaille Writes, then you are CORRECT!

Hope you like the look, Monika!

I was inspired by the look she created for her review of L'oréal's Infallible Eyeshadow in Golden Emerald. I didn't have the exact shades she used, so I took some liberties and went as close as I possibly could to her look.


Products Used

Face:
Bourjois Healthy Mix Foundation
Tarte Smooth Operator Amazonian Clay Concealer

Eyes:
Annabelle Eyeshadow in Vert-to-Go
Make Up For Ever Eyeshadows in a grey-taupe, brown-taupe, brown, and black shades (MUFE, y u no put eyeshadow names on the pan?!? >_<)
MAC Extra Dimension Skinfinish in Whisper of Gilt
NYX Retractable Eyeliner in Bronze
L'oréal Voluminous False Fiber Lashes Black Lacquer Mascara
L'oréal Voluminous Power Collagen Mascara

Cheeks:
MAC Mineralize Blush in Subtle Breeze

Lips:
Rimmel lipstick in Airy Fairy
Revlon Colorburst Lipgloss in Peony


As I mentioned above, I took some liberties with this look. I went a little bit heavier on the eyes because I feel that I need more definition and I decided to go with a lip colour that I see on Monika most often. She didn't do a glossy lip in her look, but I needed Peony to get a better colour. But I think the most telling part of this look is the inner corners of the eyes. Monika almost always highlights her inner corner and although the highlighter I used was more grainy than anything Monika's ever used, it was the one I had that would show up the most on camera (btw, so sorry for the crap quality of my photos. It's been so gloomy the last couple of days and I don't have proper lighting at home).

This post has been a lot of fun and I really hope you guys like the look (especially you, Monika-dear). Now, if you'll excuse me... It's time for me to troll everyone else's posts. I can't wait to see who got me who everyone else got! 

And a new Bandit this round:


Merry Christmas, everybody!


February 27, 2012

Making Up Is Hard To Do: A Look & Some Highlights


Practice sesh #2 was with another good friend of mine. I hadn't seen Pat in a while, so I asked if I could do her makeup and I'm glad she said yes!

Like with Missy, I was originally going to do a daytime look; but Pat asked for something smoky instead, so of course, I obliged. She offered to bring some of the eyeshadows she owns, including the original Sleek MakeUP palette, and I agreed as I wanted to have a wider range of shades to choose from. The teal and navy eyeshadows sucked me in, so I ended up using those. I'm so glad I went with blues, because they made her hazel eyes really pop.

I was slightly disappointed that I didn't have to mix any shades for her because I would really like more practice on that, but it definitely made life a bit easier. From this session, the two things I need to work on are concealing dark under eye circles and lining brows. Though, in my defense, we haven't covered brows in class yet, so this was my sad attempt at filling someone else's in. As for concealing, I always find that my initial mixing of shades makes the under eye circles look kind of ashy.


Products Used:
Make Up For Ever Face & Body Foundation - 
Make Up For Ever 5 Camouflage Cream Palette - Shade 5 (Professional Corrective Shades)
Make Up For Ever Sculpting Kit
MAC Blush - Pinch O'Peach

Make Up For Ever HD Microfinish Powder
MAC Mineralize Skinfinish - Soft & Gentle

Sleek MakeUP i-Divine Palette - Original 
Make Up For Ever Eyeshadow - Black 4
Make Up For Ever Aqua Eyes  Eyeliner - Matte Black 0L
Maybelline Great Lash Waterproof Mascara - Very Black

Make Up For Ever Lip Pencil - No. 51
Burberry Lip Mist - Camelia Pink


Hope you guys like this look! I'm really happy with how this turned out and I'm starting to feel a little bit more comfortable in my own skills. Huzzah!


Makeup Artistry Fundamentals Thoughts...


  • I am now six classes into my course and there are only four more classes left. Right now, we're focusing on day looks, (which is why I always mention how I initially wanted to do a day look, but ended up doing an evening one instead :p). Ah well, might as well get a head start on the next course, no? :p
  • Last week's class was the best I've had so far, in terms of the actual practical aspect. I paired up with a classmate that had acne, so it took me a lot longer to do her base, especially since I was using Face & Body; but I got there... And it looked really good, actually. I forgot to bring my camera, so you're just gonna have to take my word for it :p. But her skin looked quite flawless and I was incredibly proud of myself. I really liked the finished look, too, and so did my instructor. I've been doubting myself this month, but after seeing the final look, I truly felt like I could do this for a living.
  • I definitely want to get different foundations. I mean, Face & Body is great for people with good skin. But for my classmate with acne, I must've applied more than 5 layers on her face. Why bother with that many layers when you can get a more pigmented foundation and just apply 1-2? I think our kit would be better if they added an extra HD foundation and took out a Face & Body.
  • I get that this is just the fundamentals course, but I wish I could get more feedback from my instructor. I always try to preempt him by stating all the things I think I could've done better, but he just goes, "no, that's good. Great job." Then he walks away... Haha!
  • Washing your brushes every week is kind of a pain. I know I should've been washing it every week for personal use anyway, but I'm lazy, yo!


Happy Monday, lovelies!


February 10, 2012

Practice Makes Perfect (And A Spending Ban?)...


Greetings, lovelies! You know what Friday means -> WEEKEND! What's everybody's plans? Mine is to relax and do some much-needed writing. I know, I'm wild!

Anyway, if you read Wednesday's post, you'll know that I've been in desperate need of makeup application practice. Sure, I'm pretty good at applying my own, but that's because I know my face quite well (and so I should). But I want to be able to make everyone's face look as good as I want it to, so that means I need to get more practice working on faces other than my own.

So first up is my lovely and talented friend Missy! I've known this girl since we were kids- well... I believe I was 16 and she was 15. Anyway, she's the one who designed my banner and she's also a crazy-talented dancer/choreographer/designer/singer, etc!


I'm quite happy with this look, actually! I was originally thinking of doing something very natural and "bridal" with her, but I soon changed my mind when I looked at my palette. And I'll be the first to admit, I'm not very interested in creating natural looks. I like dramatic, I like colours, I like bold! So of course, I went with that :p. Hope you guys like this look! I know I do :).

Anyway, since my goal is to improve, I thought I'd list out all the things I could've done better:

  • Colour matching - I've said it before, I'll say it again. I don't have a very good eye for colour matching. I don't have a lot of foundations in my kit so mixing is definitely something I need to do. I tested MUFE HD Foundation in 120 on Missy's jaw and blended it down to her neck and it looked like a very close match, so I decided to just use the one shade. However, as I got closer to finishing the look, it looked too pale. I warmed her up a bit with some bronzer, but I really would've preferred an exact colour match. Has this happened to anyone else? Where you test a foundation shade and it looks exact but the colour seems to change once you've put it on?
  • Eyeshadow placement - I need to remember that not everybody has a lot of lid space like me. When I first applied eyeshadow on Missy, I took it too far up, which left me very little room to blend. So I had to clean off some product off the top and blend it some more. Her right eye ended up looking much better, though.
  • Fixing messes - Missy's left eye teared up a bit after I curled her lashes*, which messed up the eyeshadow a bit. I wiped any wetness away, but the eyeshadow wouldn't stick to the lid afterwards. I tried a few times, but it just wouldn't apply properly. Finally, I cleaned it off (again) with eye makeup remover, patted it dry with a cotton pad, and then applied some HD powder on the area. The eyeshadow applied much better after that, but it still wasn't as perfect as I would like.
  • Curling lashes* - Because I suck at it! >.<
  • Concealing - I really want to be able to achieve a completely flawless face. I definitely still need work on mixing the right concealer shade.
  • Lining - I lined (someone else's) eyes for the first time today! So I definitely could use more work, but I have to say I did a pretty decent job for a first timer. My tightlining went much better than my "regular lining," though; and that, I did not expect :p.
Oh, and one last thing I've learned: I either need a) make friends with photographers or b) get better camera equipment, because I want nice photographs of my work...

*Runs to check VISA bill*

Making friends with photographers it is! 

No seriously, I know I'm not a pro, but my camera absolutely did not do her base justice. I didn't have good lighting and my camera really isn't that great. I promise, her foundation looked much more even than what you see on the photo! >.<


In other news...


I've decided to go on a SPENDING BAN! (dun-dun-duuuunnnn)

With my makeup kit + my laptop + buying various other things which shall remain nameless (until I review them >.<), I have really been spending way too much. So I decided that I shall join the ranks of TracyLarie, Liz, Monica & Makeup Morsels... And I shall be successfuuuuul!

At first I was a bit worried that I'd have nothing to write about; but I figured if I spread out my reviews over a longer period and do more makeup looks, I should be fine. I haven't yet decided if I want to finish the ban at the end of May or the end of June. I'm leaning towards June because my birthday is in April, which means I'll be giving myself a respite from the Spending Ban, but only by using gift cards/birthday money. Think I can do it? I hope so!


Wish me luck!


January 30, 2012

About Face - Spring For Less


Greetings, lovelies!

I don't know about you, but I'm feeling very Spring-y as of late. My heart has been taken with purples (when is it not, though? <3) and pinks in the past few weeks, so I thought I'd do a looky-look since I haven't done one in a while.

I also wanted to do a look using all drugstore products, so I dug around my humble collection to see what I could use. It turned out to be a good thing, because I rediscovered some products that I haven't use in a while and remembered how much I love them!


Products Used:
Bourjois Paris Healthy Mix Serum Foundation - No 53 Beige Clair
Revlon PhotoReady Concealer - Light Medium 003
NYX Cream Rouge Blush - Natural (applied to the back of the cheek)
Joe Fresh Cosmetics Cream Blush - Bloom (applied to the apples of the cheeks)
NYX Cosmetics 10 Colour Eyeshadow Palette - Velvet Rope (purple)
Wet n Wild Color Icon Eyeshadow Trio - I'm Getting Sunburned (dark brown)
NYX Cosmetics Retractable Eye Liner - Black
Bourjois Paris Volume Glamour Ultra Curl Mascara - Black Curl
Revlon Lip Butter - Berry Smoothie


Hope you all like this look!

Also, thanks so much for all the love on my first post about my makeup artistry classes. Keep checking in, I'll definitely be writing about my journey often!


What colours have you been reaching for most often?


December 14, 2011

The Joe Fresh Compact Makes For An Awesome Travel Buddy


Joe Fresh has recently come out with a "mix and match" sort of palette compact that immediately made me think of Le Métier de Beauté's Kaleidoscope Kits. Except, you know... Much, much cheaper :p.

At the time, Superstore had a coupon deal where if you purchase 2 of any Face Duos, Eyeshadow Quads or Lip Duos, then you can get the starter compact for free. Each Quad/Duo retails for $12 CAD while the starter compact retails for $5 CAD.

The compact itself is made of white, sturdy, lightweight plastic. Each level snaps into place securely and the edges of each slab is magnetic so the compact stays closed. Although, it doesn't take much effort to slide out, so you might still find it open a bit when it's rattled around in your purse.


Coquette Face Duo


Both cheek products are pretty good quality. They blend well onto the skin and look quite natural. I particularly like the blush because most of my blushes are either pink or coral, so more natural looking blushes are always quite welcome. The highlighter is a lovely champagne shade that compliments the blush well.


Soft Smoke Eye Quad


I chose this eyeshadow quad because of the gorgeous shades - a deep forest green with some flecks of glitter shot through, a smoky green shade, a gorgeous taupe and a silvery grey shade. So pretty!

Unfortunately, the eyeshadow quad was a bit of a letdown. I absolutely adore the colours, but if you know me, you know that I'm not that into sheer eyeshadows. I understand that there is a time and a place for sheers, but I would've liked the option of a more pigmented look and it's much easier to sheer down a pigmented product than it is to do the reverse.

Also...

(Fallout galore! >.<)

That said, the eyeshadows are such lovely colours and they do look rather nice, as you can see from the FOTD below...


Ingénue Lip Duo


I'm a big fan of Joe Fresh lipsticks and this Lip Duo doesn't disappoint! Both shades are nicely pigmented and feel really nice on the lips. The only thing I don't like is the fact that the red shade really accentuates the dry areas on my lips by making them a tad darker. However, when my lips are in better shape, they apply evenly.


FOTD


*Please excuse my changing skintone :p. I haven't been able to figure out how to change the temperature/tint of my skin without changing the colour of the makeup. Apologies!


Are you a fan of the Joe Fresh cosmetic line?


October 19, 2011

About Face - Intense Eyeliner Look

(someone forgot to comb their eyebrows >.<)


I was inspired to recreate this look after seeing Michelle Phan's "Fun Eyeliner Looks" video on YouTube. I loved the intensity, so I whipped out the eyeliners and got to it. If you'd like to know how to create this look, then go ahead and take a look at Michelle's video (this part starts at 2:05) because for some reason, I decided to do it the hard way (i.e. using liquid liner from the get go).

Of course, I gave it my own little twist by adding another dimension to the look (you'll see in the photos below), changing the shape up a little bit so it's not as round at the top, and extending the line in the corner a little bit longer.


Products Used:

Revlon PhotoReady Foundation - 005 Natural Beige
Revlon PhotoReady Concealer - 003 Light Medium
Lancôme Star Bronzer - Éclat Bronze
Clinique Brush-On Cream Liner - True Black
NYX Cosmetics Jumbo Eye Pencil - Black
Eyeko Graffiti Eye Pencil - Jet Black
NYX Cosmetics 10 Color Palette - Velvet Rope (black w/ red-violet glitter eyeshadow)
Joe Fresh Matte Lipstick - Poppy


The most complicated part about this look was definitely getting the shape down for the eyes. I used Clinique's cream liner to trace out the shape, NYX's Jumbo Eye Pencil to fill in all the gaps (including the upper and lower waterline), and Eyeko's Graffiti Eye Pencil to make the points as precise as I could. To top off the eye look, I patted a black eyeshadow with red-violet glitter shot through on the lids. 


Hope you guys like this look!


* This is a pre-written post queued up for today, as I am currently on a month-long trip. Please do still leave a comment, I will be checking in once in a while. :)

October 12, 2011

About Face: Runway Edition - Jil Sander


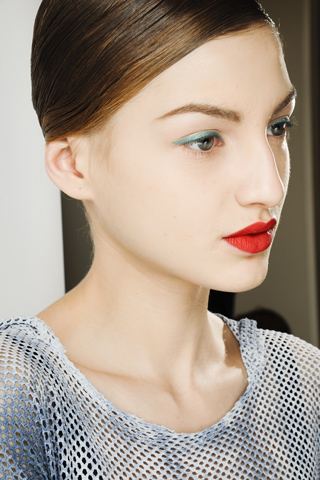
I love this Jil Sander look (from the Fall 2011 RTW show) because of its simplicity.

And yet, even in its simplicity, it's emphatically not boring. The jade eyeliner and the bright red lips make a subtle, but striking combination. Here's my take on this look created by makeup artist and global Creative Director for Chanel makeup, Peter Philips.


Products Used:
Revlon PhotoReady Foundation - 005 Natural Beige
Revlon PhotoReady Concealer - 003 Light Medium
NYX Cosmetics Rouge Cream Blush - Natural
Urban Decay Naked Palette - Buck
Cargo Cosmetics Swimmables Waterproof Eye Pencil - Teal
Wet N Wild Color Icon Palette - Pride (metallic green)
 L'oréal Voluminous Mascara - Carbon Black
Revlon Super Lustrous Creme Lipstick - Fire & Ice


In order to get a shade as close to the original as possible, I simply layered a Wet N Wild eyeshadow from the Pride Color Icon Palette on top of a Cargo Cosmetics Swimmables Eye Pencil in Teal. I winged out the eyeliner as much as I could with the pencil and fixed it up so the tip was more pointed with an angled eyeliner brush. I then applied a few coats of L'oréal Voluminous mascara.


I wanted to try something a teeny bit different with my lips. Firstly, I outlined my lips with Revlon's Fire & Ice lipstick and a lip brush. I wanted to really exaggerate the bow of my lips so I dipped the center line down more than I normally would. I also wanted to make my lower lip look less full by outlining it before my natural lip line. Unfortunately, this didn't work out so well because my natural lip line is quite pigmented. 


As I've mentioned before, I don't have the kind of face that can go without any cheek colour, so even though I didn't see any blush on the model's cheeks, I still added cream blush (NYX Rouge Cream Blush in Natural) to give my face a bit of shape. 


Hope you like! :)


* This is a pre-written post queued up for today, as I am currently on a month-long trip. Please do still leave a comment, I will be checking in once in a while. :)

October 5, 2011

About Face: Runway Edition - Armani Privé

(photo from style.com)


When I first saw this photo from Armani Privé's Fall 2011 Couture show, I instantly fell in love... I just knew I had to recreate it! So here's my little take on this gorgeous look created by makeup artist and Armani Cosmetics' creative director, Linda Cantello.


Products Used:
NYX Jumbo Eye Pencil - Milk
Sleek MakeUP Palette - Circus (orange and red shades)
NYX Eyeshadow - Tropical
Urban Decay Naked Palette - Creep
L'oréal Voluminous Mascara - Carbon Black


To start off, I applied NYX's Jumbo Eye Pencil in Milk all over the lid as a base. Then, I combined the matte orange and matte red shades from Sleek's Circus Palette and applied it all over the lid, just until the brow bone. Next up, I applied Creep from Urban Decay's Naked Palette along the upper lash line, winging it out quite a bit. About midway through the winged out portion, I started lining through the brow bone. I used a fluffy brush to blend away any harsh lines, then repeated the process, alternating between lining and blending until I was happy with the look. Then I applied Creep on the lower lash line as well, winging it upwards parallel with the upper line. I also made sure that I blended the eyeshadow downward so that the line isn't so severe. Next up, I used NYX eyeshadow in Tropical and lightly dusted that along the brow bone, over top of all existing eyeshadow. I used the Jumbo Eye Pencil in Milk again to line the lower water line and also to fill in the space between the two lines of Creep eyeshadow. Lastly, I curled my lashes and applied 2 coats of mascara.


Products Used:
Revlon PhotoReady Foundation - 005 Natural Beige
Tarte Smooth Operator Amazonian Clay Waterproof Concealer - Light
MAC Eyeshadow - Quarry
Korres Lip Butter - Jasmine
MAC Mineralize Skinfinish - Soft & Gentle


According to Linda Cantello, Armani didn't want any colour on the face. Unfortunately, I don't have the kind of face that can pull off no colour; it would look entirely shapeless! So I thought that a bit of contouring might be in order and applied Quarry onto the hollows of my cheeks and Soft & Gentle on the tops of my cheekbones. 

The model's lips look quite natural; in fact, she looks like she's not wearing any product. So, I applied Korres Lip Butter in Jasmine on my lips for a little bit of sheen.

I have to say, I'm quite proud of this recreation. The look is so beautiful and just inspires me to be more creative. Not to mention, it allows for me to work on my application technique :).


Hope you all like this look!


* This is a pre-written post queued up for today, as I am currently on a month-long trip. Please do still leave a comment, I will be checking in once in a while. :)

September 12, 2011

About Face - The Lipstick Bandit

Here's the thing, on August 30th a conversation took place via Twitter between a few beauty bloggers. As conversations are wont to do, the topic shifted from lip products, to lipsticks, to red lipsticks; all the while, we were pointing the finger at someone else for some pretty SRS lemmings. Anyway, the words Lipstick Bandits were thrown around and an idea was born.

So our task was to create a mask look with red lipstick. Here is what I came up with...


Products Used:
NYX Cosmetics Jumbo Eye Pencil - Black
Sleek MakeUP i-Divine Palette - Storm (black eyeshadow)
Maybelline Color Sensational Lip Liner - 10 Clear
Revlon Creme Lipstick - Fire & Ice
Estée Lauder Double Wear Light Foundation - Intensity 3.0
Lancôme Star Bronzer - Éclat Bronze

I started by creating a line across my forehead, dipping down in the middle and at the edges; but I wasn't really happy with the shape. So out of nowhere, I just started making really short strokes around the edges to create a "feathery" look. Satisfied, I then filled in the (very large) gap and patted some black eyeshadow on the patchier areas. 

After that, I applied foundation in the areas where my skin was visible and applied bronzer to the hollows of my cheeks. Then I applied clear lipliner, outlined my lips with Fire & Ice with a lip pencil brush and filled in the rest of my lips straight from the tube. 

Et voilà, one Lipstick Bandit look! 


I created this look on the 3rd, after waking up (rather late) to a flash of inspiration. It came about pretty quickly actually. I was rather pleased with the look, but I started doubting myself the day after. Should I have made it more complicated? Something flashier? So I started racking my brain for some better ideas but none would come. Also, I became rather attached to this look...

I think I learned an important lesson in creativity: sometimes you just have to trust your gut. I like the simplicity of this look; I like the greasy quality of the mask, I like that it's literally rough around the edges... It's like my Lipstick Bandit persona is the novice: young, brash and needs a lot of work :p.

I'm not the only Lipstick Bandit around! Check out my fellow bandits: theNotice, The Glitter Geek, Eye Heart It, Makeup Morsels, and Beauty Reflections. Their looks are going to blow you guys away!

(Yo lipsticks. I has 'em!)

(Climbin' in yo windows, snatchin' yo lipsticks up)


Hope you all like my Lipstick Bandit look!


LinkWithin

Related Posts with Thumbnails