January 30, 2012

About Face - Spring For Less


Greetings, lovelies!

I don't know about you, but I'm feeling very Spring-y as of late. My heart has been taken with purples (when is it not, though? <3) and pinks in the past few weeks, so I thought I'd do a looky-look since I haven't done one in a while.

I also wanted to do a look using all drugstore products, so I dug around my humble collection to see what I could use. It turned out to be a good thing, because I rediscovered some products that I haven't use in a while and remembered how much I love them!


Products Used:
Bourjois Paris Healthy Mix Serum Foundation - No 53 Beige Clair
Revlon PhotoReady Concealer - Light Medium 003
NYX Cream Rouge Blush - Natural (applied to the back of the cheek)
Joe Fresh Cosmetics Cream Blush - Bloom (applied to the apples of the cheeks)
NYX Cosmetics 10 Colour Eyeshadow Palette - Velvet Rope (purple)
Wet n Wild Color Icon Eyeshadow Trio - I'm Getting Sunburned (dark brown)
NYX Cosmetics Retractable Eye Liner - Black
Bourjois Paris Volume Glamour Ultra Curl Mascara - Black Curl
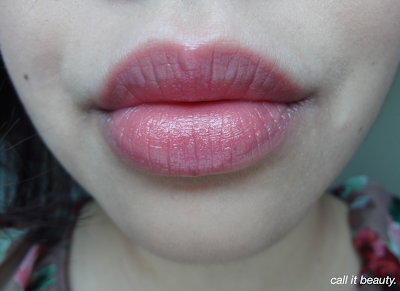
Revlon Lip Butter - Berry Smoothie


Hope you all like this look!

Also, thanks so much for all the love on my first post about my makeup artistry classes. Keep checking in, I'll definitely be writing about my journey often!


What colours have you been reaching for most often?


January 27, 2012

Making Up Is Hard To Do: Intro's, Colour Theory & Makeup Kits


I remember a few years ago, my brother and my mom both suggested I go to school for makeup artistry. I was a bit taken aback, to be honest; I really never thought that a) it was something I could do well and b) it would be a viable way to make a living...

But then, I started blogging and watching makeup artists on YouTube create and recreate different looks. I was inspired, to say the least. As I continued to blog and exercise my own creativity through the various looks I've done, I gradually fell in love with makeup artistry.

It took me a few years to finally take that step. I was really nervous about taking this road; in fact, I still am! It's always a bit daunting when you deviate from a current path, no? But last Summer, I decided that I was done putting off my future and I was finally going to enrol in some classes.

As I've become more familiar with the beauty industry, I realized that there are so many avenues one could pursue as a makeup artist. I think that's part of why I love it so much. Yes, you're basically painting skin, but there are so many different experiences that go along with it. Each job is different from the next and for an artist, that is priceless! Going into this class, I decided that I really wanted to do editorial (for the creativity) and freelance bridal (for the money), with a smattering of tv and film (for the gorgeous actors experience).

Hopefully, you'll join me on my journey to becoming a makeup artist! :)

Here's how my first two classes went...


Intro to Makeup Artistry Fundamentals

I thought it was really interesting how a lot of my classmates are in non-creative fields. A fair number of them aren't exactly sure what they would like to do with their knowledge of makeup artistry, but I think it's so cool that there's such a huge range of professions represented in the class. It also proves how important it is to have a creative outlet.

In this class, we talked about the different products and tools makeup artists use and the differences between them. Nothing completely new to most of us in the class, but it's always nice to hear what a professional makeup artist has to say about certain products. Also, I really love hearing our instructor's stories about his previous jobs. I think one of the most valuable things I'll take away from this class is the little tidbits that you don't find in a handout or curriculum. All the things my instructor has learned along the way have been filed in my brain and written down on a notebook so I can refer back to it later on. After this class, I became even more excited for the next 9 weeks. I can't wait to actually get started on the practical stuff!


Colour Theory

I knew from the get-go that this was going to be my toughest class. I understand the colour wheel, but there's this part of the lesson that involved seasons. Depending on somebody's hair, skin colour/undertone and basic overall colouring, one can either be a Winter, Spring, Summer or Autumn. The confusing part is that while I think of seasons according to makeup trends (Spring = cool, Summer = warm), it actually is contrary to what I would presume (Spring = warm, Summer = cool).

Apparently, changing one's hair colour or tanning oneself up can turn you from one season to another. For example, if you're a Summer and you dye your hair dark brown, you instantly become a Winter. But what if you also tan yourself up? Are you then a Winter or a Spring? What determines your season? BAH! /flails

Then, there's the fact that I apparently cannot tell if someone has olive undertones or not. I don't have that problem with light or dark skins, but skin with medium colouring? Forget it! There is an Asian girl in my class who is darker than me and she's considered a Winter (winter = cool), while I'm considered a Spring (warm). I just don't understand -_-'...

I just hope I don't completely flunk my Colour Theory test.


Now for what you really want to see...

Yes, you're reading that right. Our kits are from Make Up For Ever.


This bag is pretty awesome! Very professional looking.


I love that there's a lot of space for all your products and tools.


Ta-daaaaah! <3


There are two removable compartments that are velcro'd to the bag.


We received 9 brushes. 


A waterproof black liner, 2 lip liners and a Glossy Full Lip Gloss were also part of the kit,


Aren't they glorious? Previous classes didn't get such a nice selection. We got some pretty vibrant colours, whereas past classes only got neutrals. I'm actually missing #75, which is a BRIGHT pink, though I should be getting it in the next class. 


I'm really excited to get my hands at these foundations! The concealer palette is also quite fantabulous.


I can't even begin to tell you how excited I am to actually do makeup on people! I've only ever done makeup on people with similar colouring to me; but there's a wide range of skin shades and undertones in my class, so I'm quite eager to do makeup on them.

That said, what I'm really excited about is seeing where this path will lead me. Two years ago, I never would've thought that I would be going to school for makeup artistry, who knows where my life will be two years from now? Ahh, life! 


Have a good weekend, lovelies!


January 25, 2012

New Blush Obsessions!


You guys, I think I may turn into a blush fiend, this year...

I'm always looking for and at blushes nowadays. I'm trying desperately not to get sucked in, as I have plans in the next 11 months that cost money and so far, I've been successful. Just barely, though.

So I've acquired two new blushes since Christmas and in my defence: 
  • It's only 2!
  • It was Christmas!
  • I haven't gotten any blushers since then!

Huzzah and all that jazz...

Oh and another thing, these were just too gorgeous to pass up!


MAC Blush Ombré in Azalea Blossom


I'm not a stranger to Blush Ombré's... I purchased Vintage Grape, which was repromoted in the Daphne Guinness collection, sometime last year. I've since forgotten which collection it was though; who can keep up, nowadays? :p

Anyhoo, when I saw Azalea Blossom, I knew I had to have it. I've been wanting a cool-toned pink blush for a while now and when I saw that this blush looks good on warm-toned skin, well... *grabby hands*

I love that you have 3 options with this blush. Also, don't let the swatch fool you! It totally wears differently and looks lovely on my skin (I have yellow undertones).

One thing I noticed though, is that there's a thin film that sits on top of the product that made it hard for me to pick up much colour from the pan. I thought that perhaps it was just my particular blush, but I went into  2 other MAC stores and their testers were the same. So I took the edge of the cardboard packaging and gently scraped the top off a bit and this helped a lot! You all know I'm not really a fan of sheer so scraping the top off allowed me to pick up more product with my brush.


MAC Mineralize Blush in Subtle Breeze


So, so pretty!

At first, I wasn't too keen on MAC's Naturally collection; I thought it was just going to be all nudes and browns and other boring colours. I was wrong, of course. Naturally had a lot of gorgeous shades, but Subtle Breeze is the one that really caught my eye.

It's such a wearable shade that I think could possible look good on just about anybody. The texture is so soft, applies smoothly and is super blendable. Subtle Breeze gives you such a natural flush (heh... Get it? Natural? K, stopping now...) and I love that I can wear a wider shade range of lip products with it.

The only thing I'm not so happy about is the wear time. I find that this blush (like the Warmth of Coral Mineralize Blush) doesn't really stick around for longer than 3-4 hours. Although I do find that if I apply Subtle Breeze pretty much right after I apply foundation, when it hasn't completely sunk into the skin yet, it lasts a little bit longer.

These two have been in rotation ever since I got them in December and I've been loving them! Now I'm looking into getting some NARS blushes, but I haven't decided yet which ones I want to get. See, I told you... Turning into a blush fiend.


What's your go-to blusher at the moment?


January 23, 2012

My Favorite Night Balm Indeed!


I'm pretty sure I've been moaning about this on Twitter for some time now, but if you haven't heard, it goes like this: my lips, and the skin surrounding it (called the vermilion border) have been crazy dry lately. To the point where that area would constantly (but not always) feel tight and somewhat itchy. It would also sting quite often... 

This meant that I couldn't wear lipstick or lipgloss, because it would exacerbate the dryness and would feel incredibly uncomfortable. I'm not exaggerating here, peeps. I had dry flakes all over my lips and the corners of my mouth would feel so tight, I actually couldn't open my mouth too wide.

All my other lip balms, that used to be perfect for my lips, were now useless. Oh, what's a girl to do? </firstworldproblems>

So yes, I was sceptical when I saw C.O. Bigelow's My Favourite Night Balm; but the words "8 hour overnight recovery" intrigued me enough, so I ended up getting it anyway... Turns out, that was the right thing to do, because my lips haven't been this "normal" in months! When I woke up the morning after I first applied it, I immediately noticed that the tight feeling around my lips had severely lessened. I still felt a bit of tightness on the corners of my mouth, but it wasn't nearly as uncomfortable as it was before. Also, no dry flakes or itchiness! Huzzah! *fist pump*

I love that it's thick, but doesn't feel uncomfortable on the lips. The scent is light, but pleasant; not overpowering in the least. But the best part is, of course, the condition I find my lips in when I wake up in the morning. Love, love, love this stuff!


In other news...


Meet Chancho 2.0!

Yes, I named my laptop after a character from Nacho Libre... Watchu gon do bout that? Use your hands to wipe your face? No? K...


Getting a protective case was important to me, because I'm a bit of a klutz and I need all the help I can get to keep Chancho scratch-free. My last laptop had the very same case, but in a lovely purple shade. I love it because of the satin finish. The Apple store I went to was out of the purple cases, but I immediately gravitated towards this particular shade, which has become my Spring colour obsession (last Summer was coral, Fall was mustard, Winter was red).


I also got this cute bag from Forever21. I love the weave pattern; my current favourite bag, a taupe Steve Madden purse, also has a woven pattern. It's perfect because it can fit my laptop and my binder for classes, so it's become my school/work bag. I'm still on the look out for more of these types of bags, though; I'd like to have the option of switching it up once in a while.

Anyway, many thanks to everyone who's been patient while I scrounged up enough money to get a new laptop! You can bet that I'll be blogging in full force once again!


Happy Monday, lovelies! :)


January 18, 2012

These NYX Retractable Eyeliners Rock My Socks!


I'm going to be honest with you... I haven't had a great track record with pencil eyeliner.

Because my eyes are every-so-slightly hooded, they generally tend to migrate south. I did have the option of not applying the eyeliner right to the lashes; although that left a thin line of flesh showing, which only looks marginally better than the whole Raccoon Eyes look. Because of this, I like to stick to liquid or cream eyeliners. Even then, I still need to use a primer to help it stay put.

So imagine my complete and utter surprise when I discovered that the NYX Retractable Eye Liner's did just that, without the aid of primer!


Left to Right:
Golden Olive, Black, Gypsy Blue, Purple, Turquoise Blue & Bronze


I was originally drawn to these eyeliners because a) the shades were so lovely, b) they were quite pigmented, and c) they were cheap; each pencil retails for $6.99 CAD. But deep down inside, I wasn't really expecting much from them; I've been let down a lot before, you see...

But boy, was I ever wrong! These babies actually stick around for a full work day! Colour me surprised! That said, I find that I get a small bit of product under the eyes if I'm particularly active throughout the day, but it's not very noticeable. But overall, I'm so impressed with the staying power.


My favourite shades are definitely Golden Olive and Bronze. Both shades are so gorgeous and they look beautiful together! Lately, I've taken to wearing Bronze on the upper lash line (a softer alternative to the traditional black) and Golden Olive for a pop of colour on the lower lash line. 

The blue's are just as lovely and are so vibrant! Purple doesn't apply quite as vibrantly as the rest, so I find that I have to layer it on more to get the desired look. Black is... Well, black. It's not as jet black as a liquid liner or my Urban Decay Glide-On Pencil in Zero, but it's definitely black enough for me.

But if I would have to make any recommendations, definitely pick up Golden Olive and Bronze. They are beyond lovely!


What's your favourite pencil liner?


January 16, 2012

Cheap & Easy: A DIY Earring Organizer


There's something about having short hair that makes me more conscious about what I'm wearing... Now that my ears are on display, I find myself more concerned about finding pieces that will adorn them. The past few months has seen me wear and buy more earrings than I have in my entire life!

My earring collection has accumulated, but I didn't have any proper storage... They were all just dumped together in a small drawer (which made finding a lost piece a pain in the behind to find), which quickly became a nuisance. So I trolled the internet, as we all do, and found some pretty cute stands and racks... However, I wasn't really willing to shell out $30+ on them, plus shipping, so I decided to go the DIY route. I saw some really awesome earring organizer ideas online, but they wouldn't have worked for studs; so I went to a few stores on Saturday, hoping to be inspired, and came up with a super easy and very cheap solution from Michael's.

To make this earring organizer, you will need only two products:

Artist's Loft 2 Pack Value Canvas - $7.99 (from Michael's)

 Celebrate It 360 Ribbon - $2.00 (also from Michael's)


I chose a canvas because the open back allowed for me to also put studs on it. I can't say I'm artistically inclined by the way of painting, so I decided I would decorate with ribbon instead; luckily, Michael's had some on sale. I chose a pattern and simply crazy glue-d them to the back. Et voila! It's really that simple!


I really love having my (non-fancy, inexpensive) earrings displayed like this because it reminds me what I have... I don't know about you, but when things are tucked away and hidden, I tend to forget about them. This way, I can make sure they are all well loved. 

Hope you all liked my very first DIY! If you're looking for a cute way to display your earrings, why not try this "system" out? Again, it's ridiculously easy and only cost me around $10!


How do you display your jewelry?


January 9, 2012

Call It Beauty Goes Short!


On December 17th last year, I decided I was going to say goodbye to the old and hello to the new...

I have been toying with the idea of going short for some time now, but I wasn't ready for it emotionally. Like some women, I have some sort of attachment to my hair. The problem was, I started to hide behind it. I didn't want to stand out, so I kept it the same for more than 3 years.

I've wanted to get this specific cut for probably a year now, but I kept making excuses for myself. "I'll lose weight first so I'll have a better jawline" was among them. But I didn't want to make excused for myself anymore. You see, going short wasn't just a hairstyle change for me; it also symbolizes a lifestyle change. As my very wise brother told me, "if you can't even take a risk with something as insignificant as your hair, then how do you expect to be able to take risks in your life?" He was right...

I decided that I wanted to make changes, mostly with my mindset and the way I approach life. The haircut was just a physical manifestation of the internal. So, here it is:


I honestly never thought I would say this, but I've been loving having short hair! Not only does it take much less time to style, but I also feel more like myself. My previous hair was just not complimenting my face or my body in any way (although people did love the fact that it was curly/wavy). My new style has more oomph and better conveys my personality.

My stylist, Katie-Rose owns a boutique salon called Lost and Found in the Mount Pleasant area in Vancouver and I absolutely loved the entire experience. Because she's the only stylist (it is currently a one-chair salon), it felt like a more personal experience. She's super fun to talk to, is one of the nicest people I've ever met and did such an amazing job on my hair. If you're looking for a great experience for a reasonable price (she charges $40/cut for women), then definitely go to her and tell her I sent you! :)

(My cut is actually much shorter on the left side, as you can see in this photo)

If you're thinking of going short, here's a few tips:

1. Don't Make This Decision While Emotional - Post breakup? I would say, wait til you're calmer before going short. This is a big decision and you want to feel better after your cut, not more emotional.

2. Commit To A Cut - It's not enough to just decide you want to go short. Google short hairstyles and pick your favourite. Then look at that same photo often for a few months. If you still love it after that time, then go for it!

3. Prepare To Style - Depending on the cut, you will most probably have to do some styling. My current style doesn't take that much, but it's definitely still a change. If you have wavy/curly hair like me and your cut looks better with straight hair, make sure to purchase a good straightening iron and the proper hairstyling products.

4. Be Ready For Constant Trims - I don't know what it is about hair, but it seems to grow faster the shorter it is. I had my haircut 3 weeks ago and I've already gone for a trim! Maintaining your short hair takes some work; if this doesn't sound feasible for you, then it might not be a good idea to go short.

5. Go To A Good Stylist - This is probably a bit redundant, but it's so important! One of the reasons I chose to go with Katie-Rose was because she has a pretty fierce haircut. I figured that she'd "get" what I'm trying to go for better than any other stylist because she's been there.

6. ROCK IT, GIRL! - Let's face it, shorter hairstyles are generally more showstopping than long hairstyles. Once you go short, you better werk that hair! Be bold!


Do any of you have short hair?


January 4, 2012

Skincare Blitz!


You know how it is: sometimes you forget to review certain products, or they leave you underwhelmed and you're unsure as to whether or not you should even write a review. Then at times, the product is just so, unbelievably wrong for you that you find yourself never using it after a handful of tries.

Well, I have found myself at a point where I've amassed a small amount of skincare products that I have yet to write about and I thought, "why not do a short review of all of them in a single post?" And so, the Skincare Blitz was born.


1. Nude Skincare - Cleansing Facial Wash


At first, I found this cleanser to be a tad drying. But now, I find it to be perfect for my skin. It removes the last traces of makeup and leaves my skin feeling fresh after cleansing. That said, it costs £14 per 100mL bottle, plus shipping to Canada and I just don't think this product is good enough that I would repurchase it.


2. The Body Shop - Vitamin C Microdermabrasion 


This stuff works well enough, but I find it to be much too abrasive for the more sensitive areas of my face (i.e. my cheeks and my forehead). But I quite like using it around my nose, around my mouth and on my chin - the areas I find require more frequent exfoliating. 


3. The Face Shop - Brightening Rice Water Cleansing Foam


I actually quite like this cleanser but it's too much for my skin, which has decided it will be combination rather than dry at the moment. You only need a small, pea-sized amount and it's more than enough to give you enough lather for your entire face. It has a light but pleasant scent that won't irritate anybody's sensitive senses. If my skin were drier, I would definitely be using this every day. It's lovely!


4. Pure+simple - Cellular Renewal Face Cream

"On Paper," this product sounds absolutely amazing and, dare I say it, life-changing. 

I love the idea of cellular renewal and although I'm not quite at the age where this is necessary, it's always good to get a head start on anti-aging, no? 

That said, I can't, in good conscience, give this product a thorough review because I honestly only used it for a few days. Why? Because it smells absolutely awful! >.<

Granted, I do have a sensitive sense of smell, but this stuff is something else. I can't even bring myself to open the jar up and give it a sniff so I could describe how bad it smells. 


5. Marcelle Essentials - Oil Free Eye Makeup Remover Lotion

Much like Marcelle's amazing Soothing Cleansing Water, The Eye Makeup Remover Lotion is also very effective. Unfortunately, it doesn't quite remove product all from my lower lash line well; But everything else, including mascara, is removed really well.


6. The Face Shop - Oil Specialist Enriched Cleansing Oil


Mother of pearl, this stuff is thiiiick! I kind of assumed that it would work like the Shu Uemura or MAC  cleansing oils, but this product does not emulsify at all. So it's just, oil. Oil on your skin. Oil that doesn't really come off.  >.<

I'm thinking of using this in my baths, actually...


What skincare products have you been loving lately?


LinkWithin

Related Posts with Thumbnails